Android date picker example
In Android, you can use “android.widget.DatePicker” class to render a date picker component to select day, month and year in a pre-defined user interface.
In this tutorial, we show you how to render date picker component in current page via android.widget.DatePicker, and also in dialog box via android.app.DatePickerDialog. In addition, we also show you how to set a date in date picker component.
P.S This project is developed in Eclipse 3.7, and tested with Android 2.3.3.
1. DatePicker
Open “res/layout/main.xml” file, add date picker, label and button for demonstration.
File : res/layout/main.xml
<?xml version="1.0" encoding="utf-8"?>
<LinearLayout xmlns:android="http://schemas.android.com/apk/res/android"
    android:layout_width="fill_parent"
    android:layout_height="fill_parent"
    android:orientation="vertical" >

    <Button
        android:id="@+id/btnChangeDate"
        android:layout_width="wrap_content"
        android:layout_height="wrap_content"
        android:text="Change Date" />

    <TextView
        android:id="@+id/lblDate"
        android:layout_width="wrap_content"
        android:layout_height="wrap_content"
        android:text="Current Date (M-D-YYYY): "
        android:textAppearance="?android:attr/textAppearanceLarge" />

    <TextView
        android:id="@+id/tvDate"
        android:layout_width="wrap_content"
        android:layout_height="wrap_content"
        android:text=""
        android:textAppearance="?android:attr/textAppearanceLarge" />

    <DatePicker
        android:id="@+id/dpResult"
        android:layout_width="wrap_content"
        android:layout_height="wrap_content" />

</LinearLayout>
P.S The “
DatePickerDialog” is declare in code, not XML.2. Code Code
Read the code’s comment, it should be self-explanatory.
File : MyAndroidAppActivity.java
Java
package com.mkyong.android;

import java.util.Calendar;
import android.app.Activity;
import android.app.DatePickerDialog;
import android.app.Dialog;
import android.os.Bundle;
import android.view.View;
import android.view.View.OnClickListener;
import android.widget.Button;
import android.widget.DatePicker;
import android.widget.TextView;

public class MyAndroidAppActivity extends Activity {

 private TextView tvDisplayDate;
 private DatePicker dpResult;
 private Button btnChangeDate;

 private int year;
 private int month;
 private int day;

 static final int DATE_DIALOG_ID = 999;

 @Override
 public void onCreate(Bundle savedInstanceState) {
  super.onCreate(savedInstanceState);
  setContentView(R.layout.main);

  setCurrentDateOnView();
  addListenerOnButton();

 }

 // display current date
 public void setCurrentDateOnView() {

  tvDisplayDate = (TextView) findViewById(R.id.tvDate);
  dpResult = (DatePicker) findViewById(R.id.dpResult);

  final Calendar c = Calendar.getInstance();
  year = c.get(Calendar.YEAR);
  month = c.get(Calendar.MONTH);
  day = c.get(Calendar.DAY_OF_MONTH);

  // set current date into textview
  tvDisplayDate.setText(new StringBuilder()
   // Month is 0 based, just add 1
   .append(month + 1).append("-").append(day).append("-")
   .append(year).append(" "));

  // set current date into datepicker
  dpResult.init(year, month, day, null);

 }

 public void addListenerOnButton() {

  btnChangeDate = (Button) findViewById(R.id.btnChangeDate);

  btnChangeDate.setOnClickListener(new OnClickListener() {

   @Override
   public void onClick(View v) {

    showDialog(DATE_DIALOG_ID);

   }

  });

 }

 @Override
 protected Dialog onCreateDialog(int id) {
  switch (id) {
  case DATE_DIALOG_ID:
     // set date picker as current date
     return new DatePickerDialog(this, datePickerListener,
                         year, month,day);
  }
  return null;
 }

 private DatePickerDialog.OnDateSetListener datePickerListener
                = new DatePickerDialog.OnDateSetListener() {

  // when dialog box is closed, below method will be called.
  public void onDateSet(DatePicker view, int selectedYear,
    int selectedMonth, int selectedDay) {
   year = selectedYear;
   month = selectedMonth;
   day = selectedDay;

   // set selected date into textview
   tvDisplayDate.setText(new StringBuilder().append(month + 1)
      .append("-").append(day).append("-").append(year)
      .append(" "));

   // set selected date into datepicker also
   dpResult.init(year, month, day, null);

  }
 };

}
P.S The “DatePickerDialog” example above, is referenced from Google Android date picker example, with some minor change.
3. Demo
Run the application.
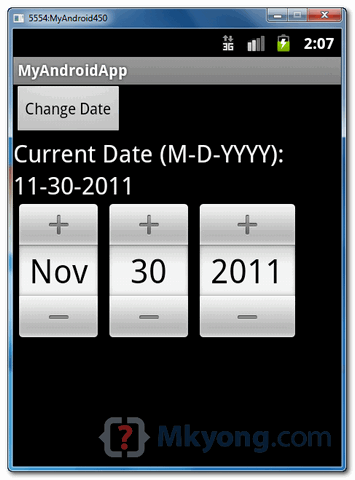
1. Result, “date picker” and “textview” are set to current date.

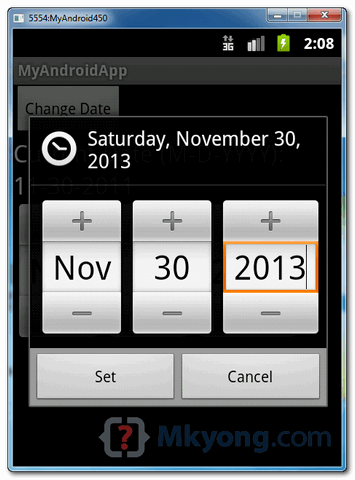
2. Click on the “Change Date” button, it will prompt a date picker component in a dialog box via
DatePickerDialog.
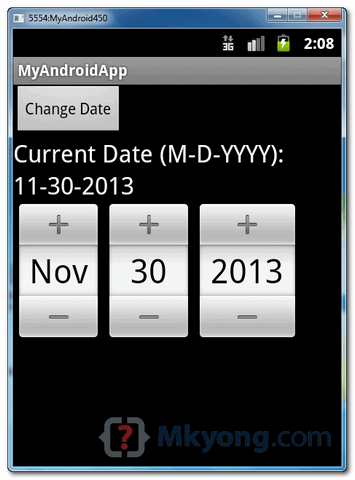
3. Both “date picker” and “textview” are updated with selected date.

Comments
Post a Comment