Android - Twitter Integration Tutorial
Android allows your application to connect to twitter and share data or any kind of updates on twitter. This chapter is about integrating twitter into your application.
There are two ways through which you can integrate twitter and share something from your application. These ways are listed below −
- Twitter SDK (Twitter4J)
- Intent Share
Integrating Twitter SDK
This is the first way of connecting with Twitter. You have to register your application and then receive some Application Id , and then you have to download the twitter SDK and add it to your project. The steps are listed below −
Registering your application
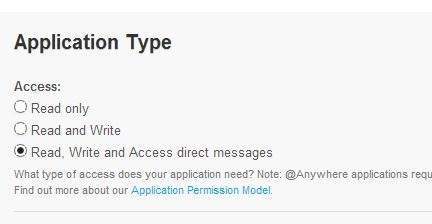
Create a new twitter application at dev.twitter.com/apps/new and fill all the information. It is shown below −

Now under settings tab, change the access to read,write and access messages and save the settings. It is shown below −
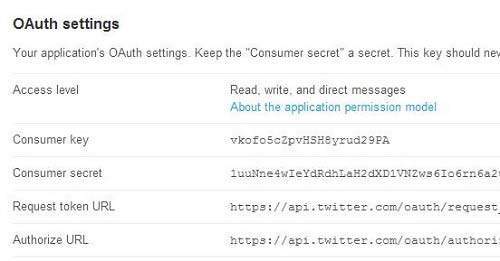
If everything works fine, you will receive an consumer ID with the secret. Just copy the application id and save it somewhere. It is shown in the image below:
Downloading SDK and integrating it
Download twitter sdk here. Copy the twitter4J jar into your project libs folder.
Posting tweets on twitter application
Once everything is complete , you can run the twitter 4J samples which can be found here.
In order to use twitter, you need to instantiate an object of twitter class.It can be done by calling the static method getsingleton(). Its syntax is given below.
// The factory instance is re-usable and thread safe.
Twitter twitter = TwitterFactory.getSingleton();
In order to update the status , you can call updateStatus() method. Its syntax is given below −
Status status = twitter.updateStatus(latestStatus);
System.out.println("Successfully updated the status to [" + status.getText() + "].");
Intent share
Intent share is used to share data between applications. In this strategy, we will not handle the SDK stuff, but let the twitter application handles it. We will simply call the twitter application and pass the data to share. This way, we can share something on twitter.
Android provides intent library to share data between activities and applications. In order to use it as share intent, we have to specify the type of the share intent to ACTION_SEND. Its syntax is given below −
Intent shareIntent = new Intent();
shareIntent.setAction(Intent.ACTION_SEND);
Next thing you need to is to define the type of data to pass, and then pass the data. Its syntax is given below −
shareIntent.setType("text/plain");
shareIntent.putExtra(Intent.EXTRA_TEXT, "Hello, from tutorialspoint");
startActivity(Intent.createChooser(shareIntent, "Share your thoughts"));
Apart from the these methods , there are other methods available that allows intent handling. They are listed below −
| Sr.No | Method & description |
|---|---|
| 1 | addCategory(String category)
This method add a new category to the intent.
|
| 2 | createChooser(Intent target, CharSequence title)
Convenience function for creating a ACTION_CHOOSER Intent
|
| 3 | getAction()
This method retrieve the general action to be performed, such as ACTION_VIEW
|
| 4 | getCategories()
This method return the set of all categories in the intent and the current scaling event
|
| 5 | putExtra(String name, int value)
This method add extended data to the intent.
|
| 6 | toString()
This method returns a string containing a concise, human-readable description of this object
|
Example
Here is an example demonstrating the use of IntentShare to share data on twitter. It creates a basic application that allows you to share some text on twitter.
To experiment with this example , you can run this on an actual device or in an emulator.
| Steps | Description |
|---|---|
| 1 | You will use Android studio to create an Android application under a package com.example.sairamkrishna.myapplication. While creating this project, make sure you Target SDK and Compile With at the latest version of Android SDK to use higher levels of APIs. |
| 2 | Modify src/MainActivity.java file to add necessary code. |
| 3 | Modify the res/layout/activity_main to add respective XML components |
| 4 | Run the application and choose a running android device and install the application on it and verify the results |
Following is the content of the modified MainActivity.java.
ppackage com.example.sairamkrishna.myapplication;

import android.app.Notification;
import android.app.NotificationManager;
import android.app.PendingIntent;

import android.content.Context;
import android.content.Intent;
import android.content.SharedPreferences;

import android.graphics.Typeface;
import android.net.Uri;
import android.support.v7.app.ActionBarActivity;
import android.os.Bundle;

import android.view.Menu;
import android.view.MenuItem;
import android.view.View;

import android.widget.Button;
import android.widget.EditText;
import android.widget.ImageView;
import android.widget.TextView;
import android.widget.Toast;

import java.io.FileNotFoundException;
import java.io.InputStream;
import static java.lang.System.currentTimeMillis;

public class MainActivity extends ActionBarActivity {
   private ImageView img;
   protected void onCreate(Bundle savedInstanceState) {
      super.onCreate(savedInstanceState);
      setContentView(R.layout.activity_main);

      img=(ImageView)findViewById(R.id.imageView);
      Button b1=(Button)findViewById(R.id.button);

      b1.setOnClickListener(new View.OnClickListener() {
         @Override
         public void onClick(View v) {
            Intent sharingIntent = new Intent(Intent.ACTION_SEND);
            Uri screenshotUri = Uri.parse("android.resource://comexample.sairamkrishna.myapplication/*");

            try {
               InputStream stream = getContentResolver().openInputStream(screenshotUri);
            }

            catch (FileNotFoundException e) {
               // TODO Auto-generated catch block
               e.printStackTrace();
            }
            sharingIntent.setType("image/jpeg");
            sharingIntent.putExtra(Intent.EXTRA_STREAM, screenshotUri);
            startActivity(Intent.createChooser(sharingIntent, "Share image using"));
         }
      });
   }

   @Override
   public boolean onCreateOptionsMenu(Menu menu) {
      // Inflate the menu; this adds items to the action bar if it is present.
      getMenuInflater().inflate(R.menu.menu_main, menu);
      return true;
   }

   @Override
   public boolean onOptionsItemSelected(MenuItem item) {
      // Handle action bar item clicks here. The action bar will
      // automatically handle clicks on the Home/Up button, so long
      // as you specify a parent activity in AndroidManifest.xml.

      int id = item.getItemId();

      //noinspection SimplifiableIfStatement
      if (id == R.id.action_settings) {
         return true;
      }
      return super.onOptionsItemSelected(item);
   }
}
Following is the modified content of the xml res/layout/activity_main.xml.
<RelativeLayout xmlns:android="http://schemas.android.com/apk/res/android"
    xmlns:tools="http://schemas.android.com/tools" android:layout_width="match_parent"
    android:layout_height="match_parent" android:paddingLeft="@dimen/activity_horizontal_margin"
    android:paddingRight="@dimen/activity_horizontal_margin"
    android:paddingTop="@dimen/activity_vertical_margin"
    android:paddingBottom="@dimen/activity_vertical_margin" tools:context=".MainActivity">

    <TextView
        android:layout_width="wrap_content"
        android:layout_height="wrap_content"
        android:id="@+id/textView"
        android:layout_alignParentTop="true"
        android:layout_centerHorizontal="true"
        android:textSize="30dp"
        android:text="Twitter share " />

    <TextView
        android:layout_width="wrap_content"
        android:layout_height="wrap_content"
        android:text="Tutorials Point"
        android:id="@+id/textView2"
        android:layout_below="@+id/textView"
        android:layout_centerHorizontal="true"
        android:textSize="35dp"
        android:textColor="#ff16ff01" />

    <ImageView
        android:layout_width="wrap_content"
        android:layout_height="wrap_content"
        android:id="@+id/imageView"
        android:layout_below="@+id/textView2"
        android:layout_centerHorizontal="true"
        android:src="@drawable/logo"/>

    <Button
        android:layout_width="wrap_content"
        android:layout_height="wrap_content"
        android:text="Share"
        android:id="@+id/button"
        android:layout_marginTop="61dp"
        android:layout_below="@+id/imageView"
        android:layout_centerHorizontal="true" />

</RelativeLayout>
Following is the content of AndroidManifest.xml file.
<?xml version="1.0" encoding="utf-8"?>
<manifest xmlns:android="http://schemas.android.com/apk/res/android"
   package="com.example.sairamkrishna.myapplication" >

   <application
      android:allowBackup="true"
      android:icon="@mipmap/ic_launcher"
      android:label="@string/app_name"
      android:theme="@style/AppTheme" >

      <activity
         android:name=".MainActivity"
         android:label="@string/app_name" >

         <intent-filter>
            <action android:name="android.intent.action.MAIN" />
            <category android:name="android.intent.category.LAUNCHER" />
         </intent-filter>

      </activity>

   </application>
</manifest>
Let's try to run your application. I assume you have connected your actual Android Mobile device with your computer. To run the app from Android studio, open one of your project's activity files and click Run  icon from the toolbar. Before starting your application,Android studio will display following window to select an option where you want to run your Android application.
icon from the toolbar. Before starting your application,Android studio will display following window to select an option where you want to run your Android application.
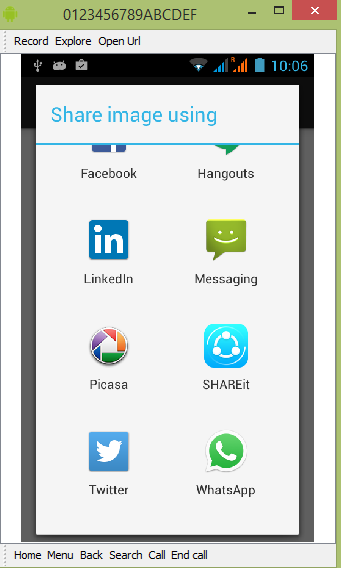
Select your mobile device as an option and then check your mobile device which will display your default screen −

Now just tap on the button and you will see a list of share providers.
Now just select twitter from that list and then write any message. It is shown in the image below −
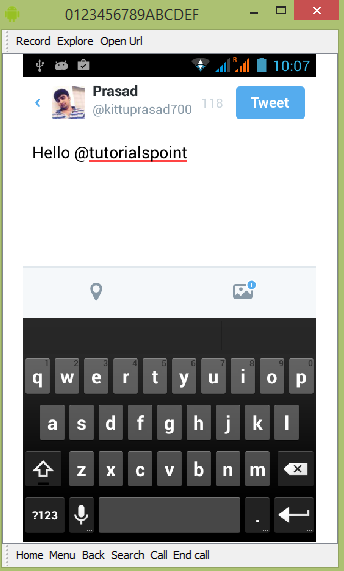
Now just select the tweet button and then it would be post on your twitter page. It is shown below −


Comments
Post a Comment