Android - Loading Spinner Tutorial
You can show progress of a task in android through loading progress bar. The progress bar comes in two shapes. Loading bar and Loading Spinner. In this chapter we will discuss spinner.
Spinner is used to display progress of those tasks whose total time of completion is unknown. In order to use that, you just need to define it in the xml like this.
<ProgressBar
   android:id="@+id/progressBar1"
   style="?android:attr/progressBarStyleLarge"
   android:layout_width="wrap_content"
   android:layout_height="wrap_content"
   android:layout_centerHorizontal="true" />
After defining it in xml, you have to get its reference in java file through ProgressBar class. Its syntax is given below −
private ProgressBar spinner;
spinner = (ProgressBar)findViewById(R.id.progressBar1);
After that you can make its disappear , and bring it back when needed through setVisibility Method. Its syntax is given below −
spinner.setVisibility(View.GONE);
spinner.setVisibility(View.VISIBLE);
Apart from these Methods, there are other methods defined in the ProgressBar class , that you can use to handle spinner more effectively.
| Sr.No | Method & description |
|---|---|
| 1 | isIndeterminate()
Indicate whether this progress bar is in indeterminate mode
|
| 2 | postInvalidate()
Cause an invalidate to happen on a subsequent cycle through the event loop
|
| 3 | setIndeterminate(boolean indeterminate)
Change the indeterminate mode for this progress bar
|
| 4 | invalidateDrawable(Drawable dr)
Invalidates the specified Drawable
|
| 5 | incrementSecondaryProgressBy(int diff)
Increase the progress bar's secondary progress by the specified amount
|
| 6 | getProgressDrawable()
Get the drawable used to draw the progress bar in progress mode
|
Example
Here is an example demonstrating the use of ProgressBar to handle spinner. It creates a basic application that allows you to turn on the spinner on clicking the button.
To experiment with this example , you can run this on an actual device or in an emulator.
| Steps | Description |
|---|---|
| 1 | You will use Android studio to create an Android application under a package com.example.sairamkrishna.myapplication;. While creating this project, make sure you Target SDK and Compile With at the latest version of Android SDK to use higher levels of APIs. |
| 2 | Modify src/MainActivity.java file to add necessary code. |
| 3 | Modify the res/layout/activity_main to add respective XML components |
| 4 | Need to create a xml file in drawable folder.it contains shape and rotate information about the progress bar |
| 5 | Run the application and choose a running android device and install the application on it and verify the results |
Following is the content of the modified main activity filesrc/MainActivity.java.
package com.example.sairamkrishna.myapplication;

import android.app.Activity;
import android.app.ProgressDialog;
import android.os.Bundle;
import android.os.Handler;
import android.view.Menu;
import android.view.MenuItem;
import android.view.View;
import android.widget.Button;
import android.widget.ProgressBar;


public class MainActivity extends Activity {
   Button b1;

   private ProgressBar spinner;
   @Override
   protected void onCreate(Bundle savedInstanceState) {
      super.onCreate(savedInstanceState);
      setContentView(R.layout.activity_main);

      b1=(Button)findViewById(R.id.button);
      spinner=(ProgressBar)findViewById(R.id.progressBar);
      spinner.setVisibility(View.GONE);

      b1.setOnClickListener(new View.OnClickListener() {
         @Override
         public void onClick(View v) {
            spinner.setVisibility(View.VISIBLE);
         }
      });
   }

   @Override
   public boolean onCreateOptionsMenu(Menu menu) {
      // Inflate the menu; this adds items to the action bar if it is present.
      getMenuInflater().inflate(R.menu.menu_main, menu);
      return true;
   }

   @Override
   public boolean onOptionsItemSelected(MenuItem item) {
      // Handle action bar item clicks here. The action bar will
      // automatically handle clicks on the Home/Up button, so long
      // as you specify a parent activity in AndroidManifest.xml.

      int id = item.getItemId();

      //noinspection SimplifiableIfStatement
      if (id == R.id.action_settings) {
         return true;
      }
      return super.onOptionsItemSelected(item);
   }
}
Following is the modified content of the xml res/layout/activity_main.xml.
<RelativeLayout xmlns:android="http://schemas.android.com/apk/res/android"
   xmlns:tools="http://schemas.android.com/tools" android:layout_width="match_parent"
   android:layout_height="match_parent" android:paddingLeft="@dimen/activity_horizontal_margin"
   android:paddingRight="@dimen/activity_horizontal_margin"
   android:paddingTop="@dimen/activity_vertical_margin"
   android:paddingBottom="@dimen/activity_vertical_margin" tools:context=".MainActivity">

   <TextView android:text="Progress Dialog" android:layout_width="wrap_content"
      android:layout_height="wrap_content"
      android:id="@+id/textview"
      android:textSize="35dp"
      android:layout_alignParentTop="true"
      android:layout_centerHorizontal="true" />

   <TextView
      android:layout_width="wrap_content"
      android:layout_height="wrap_content"
      android:text="Tutorials point"
      android:id="@+id/textView"
      android:layout_below="@+id/textview"
      android:layout_centerHorizontal="true"
      android:textColor="#ff7aff24"
      android:textSize="35dp" />

   <Button
      android:layout_width="wrap_content"
      android:layout_height="wrap_content"
      android:text="download"
      android:id="@+id/button"
      android:layout_below="@+id/imageView"
      android:layout_centerHorizontal="true" />

   <ImageView
      android:layout_width="wrap_content"
      android:layout_height="wrap_content"
      android:id="@+id/imageView"
      android:src="@drawable/abc"
      android:layout_below="@+id/textView"
      android:layout_centerHorizontal="true" />

   <ProgressBar
      style="?android:attr/progressBarStyleLarge"
      android:layout_width="wrap_content"
      android:layout_height="wrap_content"
      android:id="@+id/progressBar"
      android:progressDrawable="@drawable/circular_progress_bar"
      android:layout_below="@+id/button"
      android:layout_alignRight="@+id/textView"
      android:layout_alignEnd="@+id/textView"
      android:layout_alignLeft="@+id/textview"
      android:layout_alignStart="@+id/textview"
      android:layout_alignParentBottom="true" />

</RelativeLayout>
Following is the content of the res/drawable/circular_progress_bar.xml.
<?xml version="1.0" encoding="utf-8"?>
<rotate
   xmlns:android="http://schemas.android.com/apk/res/android"
   android:fromDegrees="90"
   android:pivotX="50%"
   android:pivotY="50%"
   android:toDegrees="360">

   <shape
      android:innerRadiusRatio="3"
      android:shape="ring"
      android:thicknessRatio="7.0">

      <gradient
         android:centerColor="#007DD6"
         android:endColor="#007DD6"
         android:startColor="#007DD6"
         android:angle="0"
         android:type="sweep"
         android:useLevel="false" />
   </shape>

</rotate>
Following is the content of AndroidManifest.xml file.
<?xml version="1.0" encoding="utf-8"?>
<manifest xmlns:android="http://schemas.android.com/apk/res/android"
   package="com.example.spinner"
   android:versionCode="1"
   android:versionName="1.0" >

   <application
      android:allowBackup="true"
      android:icon="@drawable/ic_launcher"
      android:label="@string/app_name"
      android:theme="@style/AppTheme" >

      <activity
         android:name="com.example.sairamkrishna.myapplication.MainActivity"
         android:label="@string/app_name" >

         <intent-filter>
            <action android:name="android.intent.action.MAIN" />
            <category android:name="android.intent.category.LAUNCHER" />
         </intent-filter>

      </activity>

   </application>
</manifest>
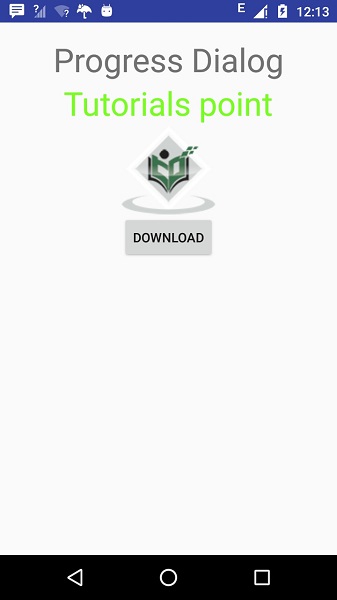
Let's try to run our application we just modified. I assume you had created yourAVD while doing environment setup. To run the app from Android studio, open one of your project's activity files and click Run  icon from the toolbar. Android studio installs the app on your AVD and starts it and if everything is fine with your setup and application, it will display following Emulator window −
 icon from the toolbar. Android studio installs the app on your AVD and starts it and if everything is fine with your setup and application, it will display following Emulator window −
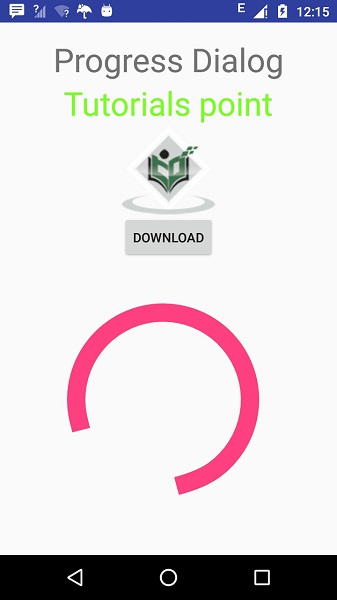
Now click on the load spinner button to turn on the loading spinner. It is shown in the image below −

Comments
Post a Comment