Android - Location Based Services
Android location APIs make it easy for you to build location-aware applications, without needing to focus on the details of the underlying location technology.
This becomes possible with the help of Google Play services, which facilitates adding location awareness to your app with automated location tracking, geofencing, and activity recognition.
This tutorial shows you how to use Location Services in your APP to get the current location, get periodic location updates, look up addresses etc.
The Location Object
The Location object represents a geographic location which can consist of a latitude, longitude, time stamp, and other information such as bearing, altitude and velocity. There are following important methods which you can use with Location object to get location specific information:
| Sr.No. | Method & Description |
|---|---|
| 1 | float distanceTo(Location dest)
Returns the approximate distance in meters between this location and the given location.
|
| 2 | float getAccuracy()
Get the estimated accuracy of this location, in meters.
|
| 3 | double getAltitude()
Get the altitude if available, in meters above sea level.
|
| 4 | float getBearing()
Get the bearing, in degrees.
|
| 5 | double getLatitude()
Get the latitude, in degrees.
|
| 6 | double getLongitude()
Get the longitude, in degrees.
|
| 7 | float getSpeed()
Get the speed if it is available, in meters/second over ground.
|
| 8 | boolean hasAccuracy()
True if this location has an accuracy.
|
| 9 | boolean hasAltitude()
True if this location has an altitude.
|
| 10 | boolean hasBearing()
True if this location has a bearing.
|
| 11 | boolean hasSpeed()
True if this location has a speed.
|
| 12 | void reset()
Clears the contents of the location.
|
| 13 | void setAccuracy(float accuracy)
Set the estimated accuracy of this location, meters.
|
| 14 | void setAltitude(double altitude)
Set the altitude, in meters above sea level.
|
| 15 | void setBearing(float bearing)
Set the bearing, in degrees.
|
| 16 | void setLatitude(double latitude)
Set the latitude, in degrees.
|
| 17 | void setLongitude(double longitude)
Set the longitude, in degrees.
|
| 18 | void setSpeed(float speed)
Set the speed, in meters/second over ground.
|
| 19 | String toString()
Returns a string containing a concise, human-readable description of this object.
|
Get the Current Location
To get the current location, create a location client which is LocationClientobject, connect it to Location Services using connect() method, and then call its getLastLocation() method. This method returns the most recent location in the form of Location object that contains latitude and longitude coordinates and other information as explained above. To have location based functionality in your activity, you will have to implement two interfaces −
- GooglePlayServicesClient.ConnectionCallbacks
- GooglePlayServicesClient.OnConnectionFailedListener
These interfaces provide following important callback methods, which you need to implement in your activity class −
| Sr.No. | Callback Methods & Description |
|---|---|
| 1 | abstract void onConnected(Bundle connectionHint)
This callback method is called when location service is connected to the location client successfully. You will use connect() method to connect to the location client.
|
| 2 | abstract void onDisconnected()
This callback method is called when the client is disconnected. You will use disconnect() method to disconnect from the location client.
|
| 3 | abstract void onConnectionFailed(ConnectionResult result)
This callback method is called when there was an error connecting the client to the service.
|
You should create the location client in onCreate() method of your activity class, then connect it in onStart(), so that Location Services maintains the current location while your activity is fully visible. You should disconnect the client in onStop() method, so that when your app is not visible, Location Services is not maintaining the current location. This helps in saving battery power up-to a large extent.
Get the Updated Location
If you are willing to have location updates, then apart from above mentioned interfaces, you will need to implement LocationListener interface as well. This interface provide following callback method, which you need to implement in your activity class −
| Sr.No. | Callback Method & Description |
|---|---|
| 1 | abstract void onLocationChanged(Location location)
This callback method is used for receiving notifications from the LocationClient when the location has changed.
|
Location Quality of Service
The LocationRequest object is used to request a quality of service (QoS) for location updates from the LocationClient. There are following useful setter methods which you can use to handle QoS. There are equivalent getter methods available which you can check in Android official documentation.
| Sr.No. | Method & Description |
|---|---|
| 1 | setExpirationDuration(long millis)
Set the duration of this request, in milliseconds.
|
| 2 | setExpirationTime(long millis)
Set the request expiration time, in millisecond since boot.
|
| 3 | setFastestInterval(long millis)
Explicitly set the fastest interval for location updates, in milliseconds.
|
| 4 | setInterval(long millis)
Set the desired interval for active location updates, in milliseconds.
|
| 5 | setNumUpdates(int numUpdates)
Set the number of location updates.
|
| 6 | setPriority(int priority)
Set the priority of the request.
|
Now for example, if your application wants high accuracy location it should create a location request with setPriority(int) set to PRIORITY_HIGH_ACCURACY and setInterval(long) to 5 seconds. You can also use bigger interval and/or other priorities like PRIORITY_LOW_POWER for to request "city" level accuracy or PRIORITY_BALANCED_POWER_ACCURACY for "block" level accuracy.
Activities should strongly consider removing all location request when entering the background (for example at onPause()), or at least swap the request to a larger interval and lower quality to save power consumption.
Displaying a Location Address
Once you have Location object, you can use Geocoder.getFromLocation()method to get an address for a given latitude and longitude. This method is synchronous, and may take a long time to do its work, so you should call the method from the doInBackground() method of an AsyncTask class.
The AsyncTask must be subclassed to be used and the subclass will overridedoInBackground(Params...) method to perform a task in the background and onPostExecute(Result) method is invoked on the UI thread after the background computation finishes and at the time to display the result. There is one more important method available in AyncTask which is execute(Params... params), this method executes the task with the specified parameters.
Check following example to have better understanding on how we use AynchTask in any Android application to get work done in the background without interfering main task.
Example
Following example shows you in practical how to to use Location Services in your app to get the current location and its equivalent addresses etc.
To experiment with this example, you will need actual Mobile device equipped with latest Android OS, otherwise you will have to struggle with emulator which may not work.
Install the Google Play Services SDK
Before you proceed to have location support in your Android Applications, you need to set-up Google Play Services SDK using following simple steps −
| Steps | Description |
|---|---|
| 1 | Launch Android Studio IDE
|
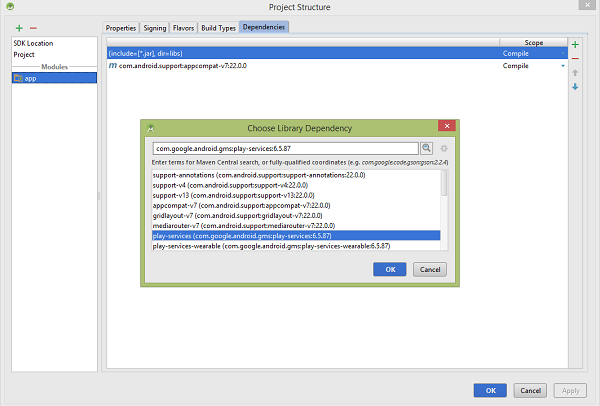
| 2 | Search for com.google.android.gms:play-services:6.5.87 or higher version library. its depend on which android version is using with. |
| 3 | Select the google play services and press apply button as shown below image |
Create Android Application
| Step | Description |
|---|---|
| 1 | You will use Android studio IDE to create an Android application and name it as Tutorialspoint under a package com.example.Tutorialspoint. While creating this project, make sure you Target SDK and Compile With at the latest version of Android SDK to use higher levels of APIs. |
| 2 | Add Google Play Service library in your project by following simple steps given below. |
| 3 | Modify src/MainActivity.java file and add required code as shown below to take care of getting current location and its equivalent address. |
| 4 | Modify layout XML file res/layout/activity_main.xml to add all GUI components which include three buttons and two text views to show location/address. |
| 5 | Modify res/values/strings.xml to define required constant values |
| 6 | Modify AndroidManifest.xml as shown below |
| 7 | Run the application to launch Android emulator and verify the result of the changes done in the application. |
Let's add Google Play Service reference in the project.Click on file > project structure > dependencies > and select + and then search google play services which will show com.google.android.gms:play-services:6.5.87 Click on ok button. it will close the choose dependencies windows. you must be close project structure by clicking apply button

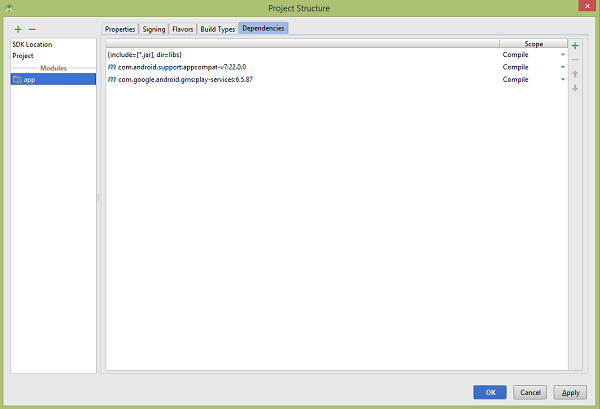
Above image is showing the result of adding google play services to project. after add google play services to project. It should be as follows

Following is the content of the modified main activity filesrc/com.example.Tutorialspoint/MainActivity.java.
package com.example.Tutorialspoint;

import java.io.IOException;
import java.util.List;
import java.util.Locale;

import com.google.android.gms.common.ConnectionResult;
import com.google.android.gms.common.GooglePlayServicesClient;
import com.google.android.gms.location.LocationClient;

import android.content.Context;

import android.location.Address;
import android.location.Geocoder;
import android.location.Location;

import android.os.AsyncTask;
import android.os.Bundle;
import android.support.v4.app.FragmentActivity;

import android.util.Log;
import android.view.View;

import android.widget.Button;
import android.widget.TextView;
import android.widget.Toast;

public class MainActivity extends FragmentActivity implements
GooglePlayServicesClient.ConnectionCallbacks,
GooglePlayServicesClient.OnConnectionFailedListener
{
   LocationClient mLocationClient;
   private TextView addressLabel;
   private TextView locationLabel;
   private Button getLocationBtn;
   private Button disconnectBtn;
   private Button connectBtn;

   @Override
   protected void onCreate(Bundle savedInstanceState) {
      super.onCreate(savedInstanceState);
      setContentView(R.layout.activity_main);

      locationLabel = (TextView) findViewById(R.id.locationLabel);
      addressLabel = (TextView) findViewById(R.id.addressLabel);
      getLocationBtn = (Button) findViewById(R.id.getLocation);

      getLocationBtn.setOnClickListener(new View.OnClickListener() {
         public void onClick(View view) {
            displayCurrentLocation();
         }
      });

      disconnectBtn = (Button) findViewById(R.id.disconnect);
      disconnectBtn.setOnClickListener(new View.OnClickListener() {
         public void onClick(View view) {
            mLocationClient.disconnect();
            locationLabel.setText("Got disconnected....");
         }
      });

      connectBtn = (Button) findViewById(R.id.connect);
      connectBtn.setOnClickListener(new View.OnClickListener() {
         public void onClick(View view) {
            mLocationClient.connect();
            locationLabel.setText("Got connected....");
         }
      });

      // Create the LocationRequest object
      mLocationClient = new LocationClient(this, this, this);
   }

   @Override
   protected void onStart() {
      super.onStart();

      // Connect the client.
      mLocationClient.connect();
      locationLabel.setText("Got connected....");
   }

   @Override
   protected void onStop() {
      // Disconnect the client.
      mLocationClient.disconnect();
      super.onStop();
      locationLabel.setText("Got disconnected....");
   }

   @Override
   public void onConnected(Bundle dataBundle) {
      // Display the connection status
      Toast.makeText(this, "Connected", Toast.LENGTH_SHORT).show();
   }

   @Override
   public void onDisconnected() {
      // Display the connection status
      Toast.makeText(this, "Disconnected. Please re-connect.",Toast.LENGTH_SHORT).show();
   }

   @Override
   public void onConnectionFailed(ConnectionResult connectionResult) {
      // Display the error code on failure
      Toast.makeText(this, "Connection Failure : " + connectionResult.getErrorCode(),Toast.LENGTH_SHORT).show();
   }

   public void displayCurrentLocation() {
      // Get the current location's latitude & longitude
      Location currentLocation = mLocationClient.getLastLocation();
      String msg = "Current Location: " +
      Double.toString(currentLocation.getLatitude()) + "," +
      Double.toString(currentLocation.getLongitude());

      // Display the current location in the UI
      locationLabel.setText(msg);

      // To display the current address in the UI
      (new GetAddressTask(this)).execute(currentLocation);
   }
   /*
   * Following is a subclass of AsyncTask which has been used to get
   * address corresponding to the given latitude & longitude.
   */
   private class GetAddressTask extends AsyncTask<Location, Void, String>{
      Context mContext;

      public GetAddressTask(Context context) {
         super();
         mContext = context;
      }
      /*
      * When the task finishes, onPostExecute() displays the address.
      */
      @Override
      protected void onPostExecute(String address) {
         // Display the current address in the UI
         addressLabel.setText(address);
      }

      @Override
      protected String doInBackground(Location... params) {
         Geocoder geocoder =new Geocoder(mContext, Locale.getDefault());

         // Get the current location from the input parameter list
         Location loc = params[0];

         // Create a list to contain the result address
         <Address> addresses = null;
         try {
            addresses = geocoder.getFromLocation(loc.getLatitude(),loc.getLongitude(), 1);
         }

         catch (IOException e1) {
            Log.e("LocationSampleActivity",IO Exception in getFromLocation());
            e1.printStackTrace();
            return ("IO Exception trying to get address");
         }

         catch (IllegalArgumentException e2) {
            // Error message to post in the log
            String errorString = "Illegal arguments " +
            Double.toString(loc.getLatitude()) +" , " +Double.toString(loc.getLongitude()) +" passed to address service";
            Log.e("LocationSampleActivity", errorString);
            e2.printStackTrace();
            return errorString;
         }
         // If the reverse geocode returned an address
         if (addresses != null && addresses.size() > 0) {
            // Get the first address
            Address address = addresses.get(0);

            /*
            * Format the first line of address (if available),
            * city, and country name.
            */
            String addressText = String.format("%s, %s, %s");

            // If there's a street address, add it
            address.getMaxAddressLineIndex() > 0 ?
            address.getAddressLine(0) : "",

            // Locality is usually a city
            address.getLocality(),

            // The country of the address
            address.getCountryName());

            // Return the text
            return addressText;
         }
         else {
            return "No address found";
         }
      }
   }// AsyncTask class
}
Following will be the content of res/layout/activity_main.xml file −
<LinearLayout xmlns:android="http://schemas.android.com/apk/res/android"
   android:layout_width="fill_parent"
   android:layout_height="fill_parent"
   android:orientation="vertical" >

   <TextView android:id="@+id/textView1"
      android:layout_width="wrap_content"
      android:layout_height="wrap_content"
      android:text="Location Example"
      android:layout_alignParentTop="true"
      android:layout_centerHorizontal="true"
      android:textSize="30dp" />

   <TextView android:id="@+id/textView2"
      android:layout_width="wrap_content"
      android:layout_height="wrap_content"
      android:text="Tutorials point "
      android:textColor="#ff87ff09"
      android:textSize="30dp"
      android:layout_below="@+id/textView1"
      android:layout_alignRight="@+id/imageButton"
      android:layout_alignEnd="@+id/imageButton" />

   <ImageButton android:layout_width="wrap_content"
      android:layout_height="wrap_content"
      android:id="@+id/imageButton"
      android:src="@drawable/abc"
      android:layout_below="@+id/textView2"
      android:layout_centerHorizontal="true" />

   <Button android:id="@+id/getLocation"
      android:layout_width="fill_parent"
      android:layout_height="wrap_content"
      android:text="@string/get_location"/>

   <Button android:id="@+id/disconnect"
      android:layout_width="fill_parent"
      android:layout_height="wrap_content"
      android:text="@string/disconnect"/>

   <Button android:id="@+id/connect"
      android:layout_width="fill_parent"
      android:layout_height="wrap_content"
      android:text="@string/connect"/>

   <TextView
      android:id="@+id/locationLabel"
      android:layout_width="wrap_content"
      android:layout_height="wrap_content"/>

   <TextView
      android:id="@+id/addressLabel"
      android:layout_width="wrap_content"
      android:layout_height="wrap_content"/>

</LinearLayout>
Following will be the content of res/values/strings.xml to define two new constants:
<?xml version="1.0" encoding="utf-8"?>
<resources>
   <string name="app_name">Tutorialspoint</string>
   <string name="action_settings">Settings</string>
   <string name="hello_world">Hello world!</string>
   <string name="get_location">Get Location</string>
   <string name="disconnect">Disconnect Service</string>
   <string name="connect">Connect Service</string>
</resources>
Following is the default content of AndroidManifest.xml −
<?xml version="1.0" encoding="utf-8"?>
<manifest xmlns:android="http://schemas.android.com/apk/res/android"
   package="com.example.Tutorialspoint"
   android:versionCode="1"
   android:versionName="1.0" >
   <uses-permission android:name="android.permission.ACCESS_COARSE_LOCATION"/>

   <application
      android:allowBackup="true"
      android:icon="@drawable/ic_launcher"
      android:label="@string/app_name"
      android:theme="@style/AppTheme" >

      <activity
         android:name="com.example.Tutorialspoint.MainActivity"
         android:label="@string/app_name" >

         <intent-filter>
            <action android:name="android.intent.action.MAIN" />
            <category android:name="android.intent.category.LAUNCHER" />
         </intent-filter>

      </activity>
   </application>
</manifest>
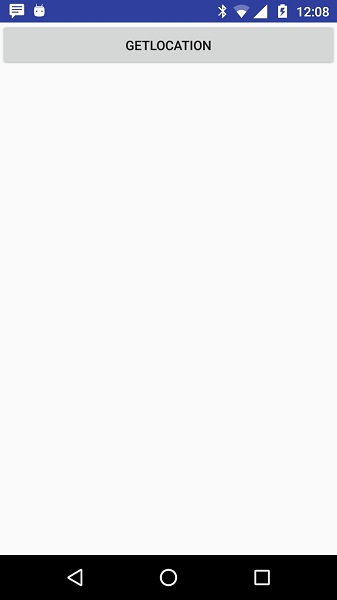
Let's try to run your Tutorialspoint application. I assume that, you have connected your actual Android Mobile device with your computer. To run the app from Android Studio, open one of your project's activity files and click Run  icon from the toolbar. Before starting your application, Android studio installer will display following window to select an option where you want to run your Android application.
 icon from the toolbar. Before starting your application, Android studio installer will display following window to select an option where you want to run your Android application.
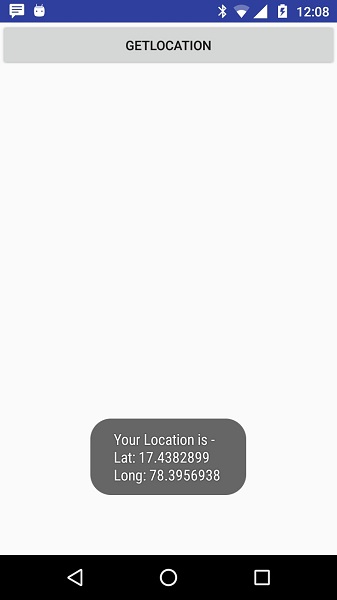
Now to see location select Get Location Button which will display location information as follows −

You can try by disconnecting location client using Disconnect Service and then connecting it by using Connect Service button. You can also modify to get location update as explained above and in Android Official documentation.
Comments
Post a Comment