Android - Spelling Checker Tutorial
The Android platform offers a spelling checker framework that lets you implement and access spell checking in your application.
In order to use spelling checker , you need to implementSpellCheckerSessionListener interface and override its methods. Its syntax is given below:
public class HelloSpellCheckerActivity extends Activity implements SpellCheckerSessionListener {
   @Override
   public void onGetSuggestions(final SuggestionsInfo[] arg0) {
      // TODO Auto-generated method stub
   }

   @Override
   public void onGetSentenceSuggestions(SentenceSuggestionsInfo[] arg0) {
      // TODO Auto-generated method stub
   }
}
Next thing you need to do is to create an object of SpellCheckerSessionclass. This object can be instantiated by calling newSpellCheckerSessionmethod of TextServicesManager class. This class handles interaction between application and text services. You need to request system service to instantiate it. Its syntax is given below −
private SpellCheckerSession mScs;
final TextServicesManager tsm = (TextServicesManager) getSystemService(
Context.TEXT_SERVICES_MANAGER_SERVICE);
mScs = tsm.newSpellCheckerSession(null, null, this, true);
The last thing you need to do is to call getSuggestions method to get suggestion for any text , you want. The suggestions will be passed onto theonGetSuggestions method from where you can do whatever you want.
mScs.getSuggestions(new TextInfo(editText1.getText().toString()), 3);
This method takes two parameters. First parameter is the string in the form of Text Info object , and second parameter is the cookie number used to distinguish suggestions.
Apart from the the methods , there are other methods provided by theSpellCheckerSession class for better handling suggestions. These methods are listed below:
| Sr.No | Method & description |
|---|---|
| 1 | cancel()
Cancel pending and running spell check tasks
|
| 2 | close()
Finish this session and allow TextServicesManagerService to disconnect the bound spell checker
|
| 3 | getSentenceSuggestions(TextInfo[] textInfos, int suggestionsLimit)
Get suggestions from the specified sentences
|
| 4 | getSpellChecker()
Get the spell checker service info this spell checker session has.
|
| 5 | isSessionDisconnected()
True if the connection to a text service of this session is disconnected and not alive.
|
Example
Here is an example demonstrating the use of Spell Checker. It creates a basic spell checking application that allows you to write text and get suggestions.
To experiment with this example , you can run this on an actual device or in an emulator.
| Steps | Description |
|---|---|
| 1 | You will use Android studio to create an Android application under a package com.example.sairamkrishna.myapplication. While creating this project, make sure you Target SDK and Compile With at the latest version of Android SDK to use higher levels of APIs. |
| 2 | Modify src/MainActivity.java file to add necessary code. |
| 3 | Modify the res/layout/main to add respective XML components |
| 4 | Run the application and choose a running android device and install the application on it and verify the results |
Following is the content of the modified main activity filesrc/MainActivity.java.
package com.example.sairamkrishna.myapplication;

import android.app.Activity;
import android.app.ProgressDialog;
import android.content.Context;

import android.os.Bundle;
import android.os.Handler;

import android.view.Menu;
import android.view.MenuItem;
import android.view.View;
import android.view.textservice.TextInfo;
import android.view.textservice.TextServicesManager;

import android.widget.Button;
import android.widget.EditText;

import android.view.textservice.SentenceSuggestionsInfo;
import android.view.textservice.SpellCheckerSession;
import android.view.textservice.SpellCheckerSession.SpellCheckerSessionListener;
import android.view.textservice.SuggestionsInfo;

import android.widget.TextView;
import android.widget.Toast;

public class MainActivity extends Activity implements SpellCheckerSessionListener  {
   Button b1;
   TextView tv1;
   EditText ed1;
   private SpellCheckerSession mScs;

   @Override
   protected void onCreate(Bundle savedInstanceState) {
      super.onCreate(savedInstanceState);
      setContentView(R.layout.activity_main);

      b1=(Button)findViewById(R.id.button);
      tv1=(TextView)findViewById(R.id.textView3);

      ed1=(EditText)findViewById(R.id.editText);
      b1.setOnClickListener(new View.OnClickListener() {
         @Override
         public void onClick(View v) {
            Toast.makeText(getApplicationContext(), ed1.getText().toString(),Toast.LENGTH_SHORT).show();
            mScs.getSuggestions(new TextInfo(ed1.getText().toString()), 3);
         }
      });
   }

   public void onResume() {
      super.onResume();
      final TextServicesManager tsm = (TextServicesManager) getSystemService(Context.TEXT_SERVICES_MANAGER_SERVICE);
      mScs = tsm.newSpellCheckerSession(null, null, this, true);
   }

   public void onPause() {
      super.onPause();
      if (mScs != null) {
         mScs.close();
      }
   }

   public void onGetSuggestions(final SuggestionsInfo[] arg0) {
      final StringBuilder sb = new StringBuilder();

      for (int i = 0; i < arg0.length; ++i) {
         // Returned suggestions are contained in SuggestionsInfo
         final int len = arg0[i].getSuggestionsCount();
         sb.append('\n');

         for (int j = 0; j < len; ++j) {
            sb.append("," + arg0[i].getSuggestionAt(j));
         }

         sb.append(" (" + len + ")");
      }
      runOnUiThread(new Runnable() {
         public void run() {
            tv1.append(sb.toString());
         }
      });
   }

   @Override
   public void onGetSentenceSuggestions(SentenceSuggestionsInfo[] arg0) {
      // TODO Auto-generated method stub
   }

   @Override
   public boolean onCreateOptionsMenu(Menu menu) {
      // Inflate the menu; this adds items to the action bar if it is present.
      getMenuInflater().inflate(R.menu.menu_main, menu);
      return true;
   }

   @Override
   public boolean onOptionsItemSelected(MenuItem item) {
      // Handle action bar item clicks here. The action bar will
      // automatically handle clicks on the Home/Up button, so long
      // as you specify a parent activity in AndroidManifest.xml.

      int id = item.getItemId();

      //noinspection SimplifiableIfStatement
      if (id == R.id.action_settings) {
         return true;
      }
      return super.onOptionsItemSelected(item);
   }
}
Following is the modified content of the xml res/layout/main.xml.
<RelativeLayout xmlns:android="http://schemas.android.com/apk/res/android"
   xmlns:tools="http://schemas.android.com/tools" android:layout_width="match_parent"
   android:layout_height="match_parent" android:paddingLeft="@dimen/activity_horizontal_margin"
   android:paddingRight="@dimen/activity_horizontal_margin"
   android:paddingTop="@dimen/activity_vertical_margin"
   android:paddingBottom="@dimen/activity_vertical_margin" tools:context=".MainActivity">

   <TextView android:text="Spell checker " android:layout_width="wrap_content"
      android:layout_height="wrap_content"
      android:id="@+id/textview"
      android:textSize="35dp"
      android:layout_alignParentTop="true"
      android:layout_centerHorizontal="true" />

   <TextView
      android:layout_width="wrap_content"
      android:layout_height="wrap_content"
      android:text="Tutorials point"
      android:id="@+id/textView"
      android:layout_below="@+id/textview"
      android:layout_centerHorizontal="true"
      android:textColor="#ff7aff24"
      android:textSize="35dp" />

   <Button
      android:layout_width="wrap_content"
      android:layout_height="wrap_content"
      android:text="Suggestions"
      android:id="@+id/button"
      android:layout_alignParentBottom="true"
      android:layout_centerHorizontal="true" />

   <EditText
      android:layout_width="wrap_content"
      android:layout_height="wrap_content"
      android:id="@+id/editText"
      android:hint="Enter Text"
      android:layout_above="@+id/button"
      android:layout_marginBottom="56dp"
      android:focusable="true"
      android:textColorHighlight="#ff7eff15"
      android:textColorHint="#ffff25e6"
      android:layout_alignRight="@+id/textview"
      android:layout_alignEnd="@+id/textview"
      android:layout_alignLeft="@+id/textview"
      android:layout_alignStart="@+id/textview" />

   <ImageView
      android:layout_width="wrap_content"
      android:layout_height="wrap_content"
      android:id="@+id/imageView"
      android:src="@drawable/abc"
      android:layout_below="@+id/textView"
      android:layout_centerHorizontal="true" />

   <TextView
      android:layout_width="wrap_content"
      android:layout_height="wrap_content"
      android:text="Suggestions"
      android:id="@+id/textView3"
      android:textSize="25sp"
      android:layout_below="@+id/imageView" />

</RelativeLayout>
Following is the content of the res/values/string.xml.
<resources>
   <string name="app_name">My Application</string>
   <string name="hello_world">Hello world!</string>
   <string name="action_settings">Settings</string>
</resources>
Following is the content of AndroidManifest.xml file.
<?xml version="1.0" encoding="utf-8"?>
<manifest xmlns:android="http://schemas.android.com/apk/res/android"
   package="com.example.sairamkrishna.myapplication" >

   <application
      android:allowBackup="true"
      android:icon="@mipmap/ic_launcher"
      android:label="@string/app_name"
      android:theme="@style/AppTheme" >

      <activity
         android:name=".MainActivity"
         android:label="@string/app_name" >

         <intent-filter>
            <action android:name="android.intent.action.MAIN" />
            <category android:name="android.intent.category.LAUNCHER" />
         </intent-filter>

      </activity>

   </application>
</manifest>
Let's try to run ourr application we just modified. I assume you had created your AVD while doing environment setup. To run the app from Android studio, open one of your project's activity files and click Run  icon from the toolbar. Android studio installs the app on your AVD and starts it and if everything is fine with your setup and application, it will display following Emulator window −
icon from the toolbar. Android studio installs the app on your AVD and starts it and if everything is fine with your setup and application, it will display following Emulator window −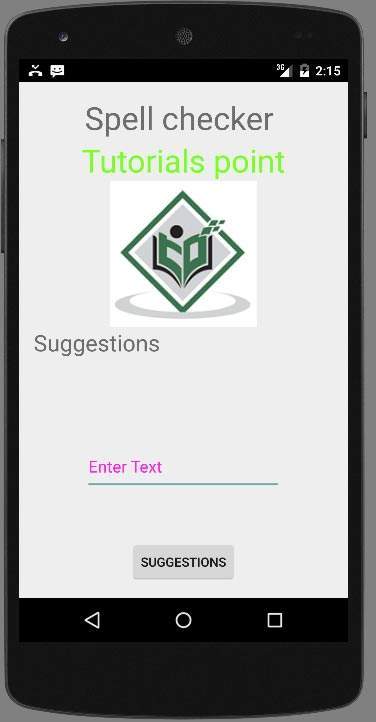
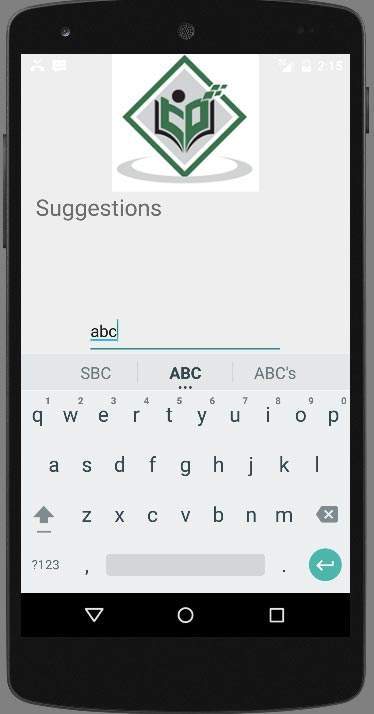
Now what you need to do is to enter any text in the field. For example , i have entered some text. Press the suggestions button. The following notification would appear in you AVD along with suggestions −
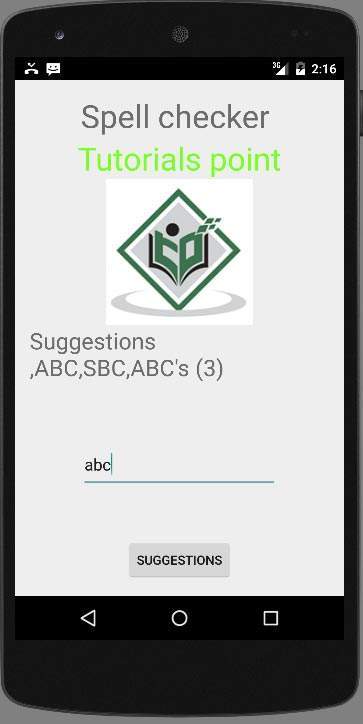
Now change the text and press the button again, like i did. And this is what comes on screen.


Comments
Post a Comment